How to Fix a Chipped Laminate Floor: Step-by-Step DIY Guide
Discovering a chip or scratch on your laminate floor can be a real bummer. You’ve invested time and money into creating a beautiful space, and now it’s marred by an unsightly blemish.
But don’t despair. Minor damage to laminate flooring is often surprisingly easy to fix, and you can do it yourself without breaking the bank. This guide walks you through exactly how to repair a chip, which product to use, and the point at which it makes more sense to replace the plank or call a professional.
Can a chipped laminate floor be repaired?
Yes. In most cases a chip in laminate flooring can be repaired without replacing the plank. Small to medium chips are filled with colour-matched laminate filler, putty or a wax repair stick, then smoothed and blended into the surrounding finish. Replacement is only necessary when the chip is very large, the core has swelled from water, or several planks are affected.
Assess the Damage
Before you grab your repair kit, take a moment to assess the damage. There are a few common types you might encounter:
- Minor scratches: superficial surface marks that don’t penetrate the top layer, usually from dragging furniture or pet claws.
- Deeper scratches: these cut through the protective wear layer and are visible looking straight down at the floor.
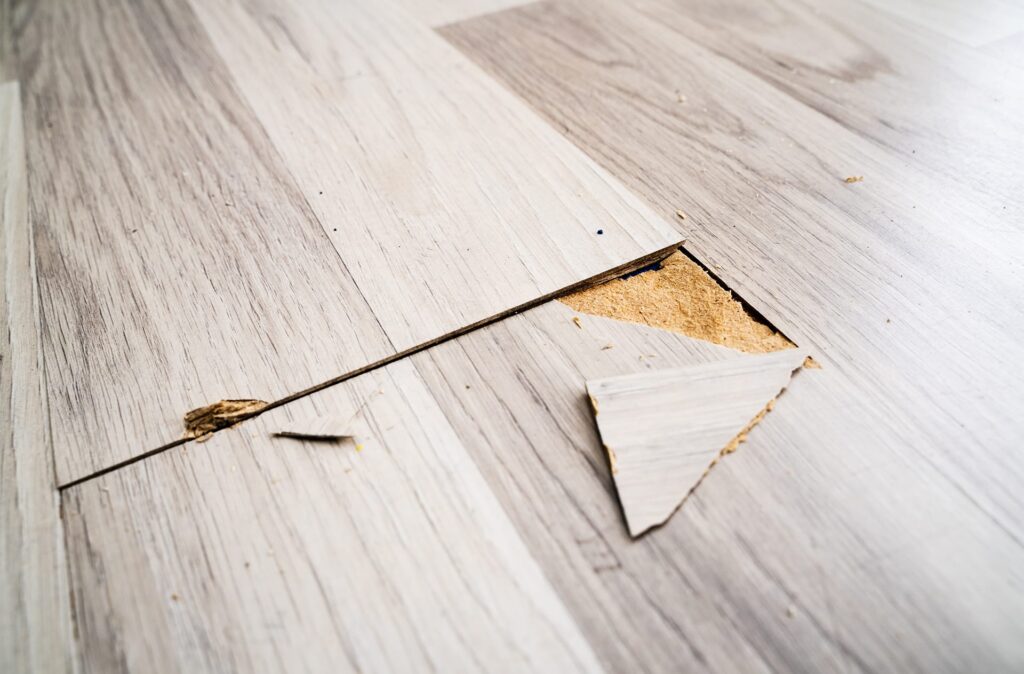
- Chips or gouges: small pieces of the laminate have broken away, exposing the core underneath, often from a dropped object or heavy impact.
The severity decides the method:
- Minor scratches can be buffed out or hidden with a repair marker.
- Deeper scratches and small chips need filling with putty or wax.
- Larger chips or gouges may mean replacing the plank.

Safety first
Clear the area of furniture and debris before you start, and wear gloves and eye protection if you’re using tools or chemicals.
Gather Your Supplies
- Cleaning supplies – mild detergent, water, soft cloth
- Repair kit – a laminate repair kit that matches your floor’s colour
- Putty knife or applicator – for applying and smoothing repair compound
- Fine-grit sandpaper – for smoothing filled areas
- Soft cloth – to remove excess material and buff the repair
- Painter’s tape (optional) – to mask off the area around the repair
How to Fix a Chip in Laminate Flooring
For a typical chip, you can have an almost invisible repair in about 30–45 minutes:
- Clean the area. Wipe the chip and surrounding floor with a damp cloth to remove dust and debris, then let it dry. A clean surface helps the filler bond and finish smoothly.
- Remove loose edges. Gently lift away loose flakes or splinters around the chip with a putty knife so the filler can sit flush.
- Mask the edges (optional). Run painter’s tape around the chip to keep filler off the undamaged laminate and make cleanup easier.
- Apply the filler. Press colour-matched laminate filler or putty firmly into the chip with a putty knife, slightly overfilling, then drag the knife flat across to level it with the floor.
- Smooth it. Before the filler hardens, wipe across the repair with a damp cloth to remove excess and feather the edges into the surrounding floor.
- Let it cure. Allow it to dry per the manufacturer’s instructions — often a few hours, though some products need overnight.
- Blend and buff. Lightly smooth any raised spot with fine-grit sandpaper, match the grain and tone with a repair marker, then buff with a soft cloth.
Repairing scratches
The same kit handles scratches. For minor scratches, clean the area, trace a colour-matched repair marker along the scratch, let it dry, then buff with a soft cloth. For deeper scratches, fill with colour-matched putty or wax, smooth with a putty knife, let it cure, lightly sand, then wipe clean.
Filler vs. Putty vs. Wax vs. Marker: Which to Use
Matching the product to the damage is what makes a repair look invisible instead of obvious:
| Product | Best for |
|---|---|
| Repair marker / pen | Light surface scratches and final colour touch-ups — trace along the grain. |
| Wax stick | Deeper scratches and small dents — warmed, pressed in, then scraped level. |
| Laminate filler / putty | Chips and gouges, where you need to rebuild missing material. |
| Universal (multi-tone) kit | Floors that blend several shades, so you can mix to match. |
Whatever you choose, match the colour in daylight and test on a hidden area first if you’re unsure.
When the Chip Is Too Big: Replacing a Single Plank
If the chip is large, the core is exposed and crumbling, or filler won’t hold, the cleaner fix is to swap the damaged plank — which is exactly why it’s worth keeping a few spare planks after any installation.
- Click-lock floating floor: if the damaged plank is near a wall, remove the baseboard, then unsnap and number the planks back to the damaged one, swap in a spare, and re-lock the row.
- Mid-room or glued-down floor: it’s usually faster to cut the damaged section out and fit a replacement plank, then secure the seams with flooring adhesive.
This is a more involved job. If you’re not confident cutting into a finished floor, bring in a professional rather than risk the surrounding planks.
Common Mistakes to Avoid
- Using the wrong colour: match the kit to your floor as closely as possible, and test on a hidden area first.
- Overfilling: apply putty or wax in thin layers so you don’t have to sand down a large, uneven area.
- Not allowing enough drying time: let the material cure fully before sanding or walking on the repair.
- Rushing: take your time and follow each step for the best result.
Tips for Success
- Practise on a spare plank first to get comfortable with the technique.
- Blend the repair with a touch-up marker after sanding for a seamless look.
- Apply a sealant over the repair for added protection against future damage.
How to Keep Your Laminate Looking Flawless
The best repair is the one you never have to do. A few habits go a long way:
- Use furniture pads – felt pads under chair, table and sofa legs prevent chips and scratches when things shift.
- Mats and rugs – doormats at entrances trap grit before it’s tracked in; area rugs protect high-traffic lanes.
- Trim pet nails – protects both the floor and your pet’s paws.
- Wipe spills promptly – laminate isn’t fully waterproof, and moisture is the main cause of swelling and core damage.
- Avoid harsh cleaners – use a cleaner made for laminate; harsh chemicals damage the protective coating.
- Invest in quality flooring – durable laminate flooring from LV Flooring is built to resist scratches, stains and fading.
- Apply a protective coating – a clear sealant adds an extra barrier against scratches and moisture.
When to Call a Professional
A repair kit and a bit of patience handle most cosmetic chips and scratches. Lean toward professional help when:
- The damage spans multiple planks or a large area.
- A deep gouge has penetrated the core layer.
- Water has seeped in and caused swelling, warping or a musty smell — see our guide on repairing swollen laminate flooring.
- You simply want a seamless, guaranteed result.
Frequently Asked Questions
Can a chipped laminate floor be repaired?
Yes. Most chips can be repaired without replacing the plank — fill with colour-matched laminate filler or putty, smooth, then blend with a repair marker. Replacement is only needed for very large chips, water-swollen planks, or damage across several boards.
What is the best filler for laminate floor chips?
A colour-matched laminate filler or putty is best for chips because it rebuilds the missing material. Wax sticks suit deeper scratches and dents, while a repair marker is for light surface scratches and final colour blending.
Can you replace just one plank of laminate flooring?
Yes. On a click-lock floating floor you can unsnap planks back to the damaged one, or cut out and replace a single plank in the middle of the room. Keeping spare planks from the original installation makes this easier and ensures a match.
Will the repair be invisible?
With a close colour match and careful blending, most chip repairs are nearly invisible from standing height. Matching in natural daylight and finishing with a grain-matched repair marker gives the best result.
Can water-damaged or swollen laminate be repaired?
Usually not — once the fibreboard core absorbs moisture and swells, the affected planks need replacing. If you see swelling, lifting edges or a musty smell, fix the moisture source first.
LV Flooring: Your Professional Flooring Partner
If the damage is beyond a quick fix, don’t hesitate to contact LV Flooring. Our flooring professionals can assess the damage, colour-match and repair or replace affected planks, and restore your laminate floor to its original beauty — quickly and cleanly. We serve Toronto and the GTA and offer a full range of repair and installation services.
Call (416) 665-5645 or request a free quote today.